Friday, December 30, 2011

Raspberry Experimentation...


Quick and Easy Sweet Raspberry Biscuits
1 tube refrigerator biscuits (can use low fat)
1/3 C frozen raspberries
1 T + 1 t sugar (I used Splenda)
1/8 t cinnamon
Cinnamon sugar to sprinkle over the top

1. Preheat oven to 400 degrees.
2. Line cookie sheet with parchment paper.
3. Mix raspberries, sugar and cinnamon in a small bowl, set aside.
4. Roll out each biscuit into an oblong circle.
5.Add 1 heaping teaspoon of raspberry filling.
6. Fold biscuit in 1/2 and seal edges with prongs of a fork.
7. Place on cookie sheet lined with parchment paper.
8. Spray tops with cooking spray and sprinkle generously with cinnamon sugar.
9. Bake for 13 minutes.
10. Remove from oven and spread about 1/2 t. cream cheese frosting on each pastry.

Makes 10 pastries.
I even froze the leftovers to use as toaster-oven pastries for hurried mornings!

How this recipe came about:
I found a wonderful looking raspberry sweet roll that made my mouth water this morning. As I looked at the recipe ingredients, I had all of them, but ..... boy did kneading, rising bla bla bla... look like a lot of work. So, my clever lazy side kicked in and I was determined to find an easier way to make a mouthwatering raspberry sweet roll.

I took 10 oz of frozen raspberries, and added 1/4 cup of  sugar (I used Splenda), and about 1/4 teaspoon of cinnamon. (This made enough for about 30 pastries!)

Now for the difficult part... the dough. Wait! I had a roll of refrigerator biscuits that I didn't know what to do with! Perfect!!
 
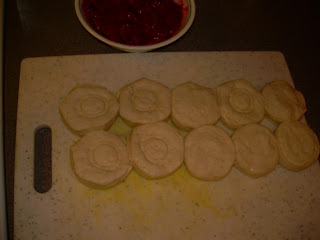
Since I had rolled sweet rolls in my head, I put the 10 rolls together to make one long section of dough,
then pinched all of the ends together.
I added half of the raspberry mix, and then ended up scooping 2-3 T off as I rolled it up!
I sliced the dough log into 10 sections and placed on a cookie sheet lined with parchment paper. I gave them one final generous sprinkling of cinnamon sugar.
I baked them at 400 degrees for 13 minutes, added a very small dab of cream cheese frosting and....
Hmmm... my "pinching" job didn't hold too well. 
However, the rolls were wonderful!!
YUM. Not too sweet, not too tart. Just right!
Easy, and mouthwatering, just what I was going for!

 You can see the results of my second attempt in the first photo! Much nicer looking in my opinion. There you have it. My morning of experimentation! My family seemed to like the results as well.

Have you ever experimented with a recipe with great results? Or maybe your results were more humorous than tasty? I'd love to hear your stories!

Have a Happy Last Friday of 2011!
Tina


Tuesday, December 20, 2011

Twine Christmas Stars

I was browsing through Pinterest this morning looking for a last minute gift, and ran across the following pin:
"Cool" I thought to myself. However, when I dug a little further, I noted that these twine stars were for sale, and I was not able to find a pattern when I "Googled" it. (BTW, if you would like to purchase these stars you can find them here.) Being so cheap, broke, crafty, I decided to come up with a homemade twine star. I found a pattern for a 5 pointed star that I thought would work, and set out to rework it to use with twine. Here's what I came up with:

STAR
Hook Size: I used 3 different hooks to make the different size stars. H, K and N.

Using twine, chain 5; join with slip to form ring. (You'll want to keep your stitches loose)
Round 1: Ch 1, work 10 sc in ring, join with slip to first sc—10 sc.
Round 2: * Ch 6, skip next sc, slip st in next sc; repeat from * 4 times, join with a slip st in base of beginning ch-6—five ch-6 spaces.
Round 3: Ch 1, work [3 sc (4 for larger hooks), ch 5 (3 for larger hooks), 3 (4) sc] in each ch- 6 space, join with slip to first sc—five ch-5 corner spaces.  Slip Stitch in next 5 sc to reach the top of the star point. In top sc, 1sc, stretching the loop to make a hanger:
 Tie loop to twine's tail to fasten off and form hanger:
Leave a tail when you cut the twine, and weave it in (I used a #4, 2mm hook because I found a yarn needle was nearly impossible to use).

At this point, to keep the star flat, I wet them down and stretched them into the desired shapes, then left them to dry.
You could place a heavy book on top, but since I need to give these as gifts tonight, I want to be sure they dry quickly. I added some dollar store rusty bells to complete the country feel.

Not bad! While they are not quite as "perfect" as my original inspiration photo, I was able to complete all 3 stars in about 45 minutes. So with a time investment of only 15 minutes each (plus a couple minutes for the bells) this makes very quick, really cute country ornaments!


Happy crocheting! And have a wonderful week before Christmas!
Tina

And the angel said unto them, "Fear not!
  Behold I bring you good tidings of great joy
which will be to all people,
Unto you is born this day
a Saviour which is Christ the Lord."
Luke 2:11

Monday, December 19, 2011

Repurposed Potting Bench

What?? We're talking about a gardener's potting bench the week before Christmas? I know its crazy, but it was 18 degrees here this morning, and somehow I am dreaming of spring. Not a good sign since spring doesn't hit the high desert until about May in Central Oregon! That's nearly 6 months from now! OUCH! Well, I'll just dream for a few minutes. You're welcome to join me in my dream!
This is my wonderful new potting bench! My husband built this bench for me from a very old packing crate that we carted home from a friend's yard (saving it from the burn pile) several years ago. It has been taking up space stored in the back yard since then, and we were not sure what to do with it until last summer! We added some scrap wood we had around the house, an old, unwanted mirror from my daughter's room, and a sink we purchased for $5 at the local Habitat for Humanity ReStore! (If you have a local ReStore, I highly recommend going! LOTS of wonderful stuff at great prices, and your money goes to a great cause!)
My DH, Dan, started out by reinforcing the box. Years of exposure to the elements meant that the poor box was a little weak, but it also meant it was weathered in a very attractive way! The addition of 2x4's and wood glue added strength to our base. At this point Dan removed the front panel from the box. This was eventually split in two pieces making the doors which transformed our box into a cabinet.
We stood the shell back upright, and DH added the 4x4 posts to the back that would hold the mirror and shelves across the back. Dan decided to add fresh deck boards to the top of the box since it will see a lot of down and dirty potting soil action in the future. This also made a nice solid counter to put our sink in. We coated the boards with Thompson's Water Seal to protect them from water damage.

From here, you will have to use your imagination because there are no more "in progress" pictures. We had all 4 of our granddaughters at the house at the time (ages 6, 5, and our two 2 year olds), so we were... slightly distracted! 

Dan cut the hole in the counter top, dropped in the sink, mounted the mirror and additional backing boards, and bingo! (Well, actually this is a major oversimplification of this project, but since I was only slightly involved, I don't have all the details. I was building a pallet table for our back yard at the time. Maybe I'll write about that project sometime in the future.)
We still need to "plumb" and drain the sink, and add shelves to the inside, but the frame work is complete, and sitting out in the cold waiting for warmer days! I will add more, (and better) photos when we complete the project this spring.

Thanks for letting me veer from the Holiday Season for a few minutes this morning! I feel better already!

Have a great day!!

Tina

Saturday, December 17, 2011

Shabby Snowman Family

With Christmas fast approaching, I have just a couple more gifts to complete. One crafty gift that I have been wanting to try since I saw it at a wee Meenit is cute little snowmen made out of chenille. Since I found a chenille bedspread at a yard sale last summer, I had plenty of fabric to work with. Here's my version(s) of these cute little guys.
This was a fun and easy craft, and it was exciting to see what each snowman's personality would turn out to be. They kind of took on a life of their own once I added the stuffing!

The basic body is just a tube of chenille fabric with a rounded top. Once I had the tube sewn together, I held it upright on top of another scrap of chenille, cut a square that was roughly the same diameter as the snowman's bottom, and then folded it in quarters and trimmed the edges to make a circle. (I know this sounds confusing, and I'm sorry there are no pictures, but really you just need a circle that is about the same size as the round opening on the bottom.) I then attached 1/2 of the circle to the bottom of my snowman with my sewing machine, leaving a large enough opening to add the stuffing (I used plastic grocery bags) and ballast.

For the ballast, I used rocks on the larger snowmen, and dried beans for the smaller ones.
I encased them in a plastic bag to contain them, and keep any dirt safely away from the snowman.
Then I covered the bag with a scrap of white fabric to keep it from showing through the chenille.
Since this is going to be inside the snowman, neatness does not matter. Just do it quick and dirty!
Stuff your little pouch into Frosty's bum, and arrange your stuffing around it so he stands straight(ish) (a little listing to the side actually adds character to your little guy).
Close up the hole, being sure to stay away from the fabric edge so it won't unravel and pull apart down the road. I actually stood the snowmen up at this point so that I could make final adjustments to how he ended up standing as I sewed him together. With some of them I ended up taking in quite a bit of fabric on one side or the other to keep them from falling over.
Since I used chenille, I was not too careful about neatness at this point either because it will not show in the end. If you choose to use a different, less "messy" fabric, you will need to be more careful to be sure your bottom seam is neat and even.

Now comes the fun part! Adding faces and accessories! I used only scraps, buttons and things I had on hand to keep this craft cheap economical.
This was my first little guy. His buttons and accessories are actually sewn on. Then I looked at how much time I was taking, and broke out the hot glue gun for the other 5 snowmen!! The hat is simply a tube of fabric from an old felt scarf, tied off at the top with a scrap of the same fabric. The scarf is a strip from the end of the same felt scarf.
The plan was to have all of the snowmen dressed the same, but with different colored hats and scarves. However, this guy insisted on being Gandalf, and I just couldn't argue with him. It was meant to be!
Having already veered from my original plan, I figured, "what the heck" and got into the fringe from the edge of my chenille bedspread to add hair to this snowman. I know, I know, snowmen don't have hair, but ... well, deal with it! He was screaming to be a beatnik, and I answered the call. I simply put two strips of fringe back to back between the fabric as I sewed it together. I can just hear him reading eclectic poetry to other beatniks in some smoke filled room.
The other three snowmen were more obedient, and stayed on track as I made them. Well, except for the tallest one, who insists on wearing his hat half cocked on his head. My dad always wore his hat like that, so I didn't fight it! It was kind of a warm fuzzy for me!

These snowmen will be given to very dear friends in just a couple days. That is why there are six of them, one for each member of the family. As far as which one belongs to who, they will have to figure that out for themselves!

Have a VERY Merry Christmas!! May the joy of the season fill your homes with love and laughter!
Tina

For unto us a child is born, unto us a son is given; and the government shall be upon his shoulders: and his name shall be called Wonderful, Counsellor, Mighty God, Everlasting Father, Prince of Peace.
 Isaiah 9:6


Wednesday, December 14, 2011

Pepperminty Gifts!

Well, I have been somewhat thwarted in my Christmas gift making since my trusty sewing machine needed to visit the repairman! I am so grateful to have it back so I can get back to work!! But I have not been completely idle the last week.

Holiday Baking!!

Gift baskets filled with goodies for friends and family.

Some of the gift basket goodies were made from mint I had drying in the kitchen (you can see in the baking photo that there is still quite a bit hanging on my hutch). The Lemon Peppermint Salt Scrub is for my fellow greenhouse workers with dirty hands! I found some great scrub recipes here, and added my own peppermint flair to the lemon scrub! A few drops of peppermint oil, and finely ground peppermint leaves added to the Lemon Salt Scrub made a very refreshing body scrub!
The tea is really quite wonderful too! Since, I also had dried rosemary that needed to be used, I "Googled" rosemary & peppermint together, and BINGO! Well, actually, it wasn't quite that easy. I didn't find a recipe, but I found some that were close so I tweaked what I found and came up with a great tea! Basically, it is a lot of mint, and less rosemary run very quickly through the food processor, and packaged in a cute little mason jar! Add some cute tags and Wallah! I Love making fun gifts out of things I have around the house!

Have a wonderful Christmas Season!!

Friday, December 2, 2011

Simply Cute Giftwrap!

I challenged myself this season to do as many repurposed gifts as possible. (The Sentimental Sachets from yesterday's post were made from repurposed items that I had around the house, with the addition of a couple thrift store goodies. I LOVE THRIFTING!)

Well, today I will show you how I gave my over abundance of brown paper shopping bags new life as gift wrap! Now, I know some of you are thinking, "It's only Dec. 2nd! Why is she already wrapping gifts?" Well, let's just say I'm a little excited about Christmas this year! This is the first year in many that I have not been working during the holiday season, and its been so fun to "play" at gift making, so just let me have my fun! :o)

With the addition of some scrap fabric, cloth and paper flowers and my trusty hot glue gun, I was able to create something really cute from junque!

Paper rose with denim leaves.

Newsprint buds.

Simple, tea stained muslin flower.

Now, these are a little frilly for a man's taste, but wait, not a problem. Here's the manlier (is that a word? - More manly?) versions!

The K in Kyle was ironed on using iron on adhesive from the fabric store.

My favorite repurposing medium... Denim!

And the ultimate manly gift wrap:

Yes, the highly desired Ace Hardware bag! My husband is already drooling! (Too bad the gift inside isn't really from Ace. Sorry Honey.)

And speaking of bags, here are some simple lunch sacks decked out for holiday giving.

Simple ripped denim strip bows, a little raffia, and bingo! Cute in a bag!

So there you have it! Have fun with your gift wrap this year. Use unusual items like paper bags, unwanted fabric, or the ugly Christmas sweater Aunt Marge gave you to wrap gifts this year! Happy Wrapping!

Thursday, December 1, 2011

Sentimental Sachet

Today I finished a project I've been wanting to do for some time. Many weeks ago I saw this great Pocket Pillow over at Katie's Rose Cottage and LOVED it! Well, today, I completed my version of this project... twice! One as a wedding gift, and one as a Christmas gift for my in-laws who celebrated their 50th wedding anniversary this year! Sort of like book end wedding gifts!


Here is the wedding gift for my sweet niece and her new hubby. In my version of this gift, I filled the pillow with lavender scent, and created a laminated keepsake photo book of wedding pictures to put in the pocket.

The sachet for my in-laws is much smaller, and has a lot more photos in the little album, which only makes sense. After 50 years you have a lot of material to choose from! Here's how I did it:

To make the pillow, follow this link for a tutorial. To make it a scented sachet, I added simply lavender essential oil to the wedding pillow. For the anniversary sachet I put in dried pine needles from our Christmas tree, because pine is one of my mother-in-law's favorite scents. (She says it reminds her of her childhood home in Germany!) I buried the needles in the center of the stuffing so that they wouldn't get "poky."

To make the photo book, I started by gathering photos of my in-law's life together. When they met, their engagement, meeting the parents, birth of children, etc. I also chose a red card stock for matting. I would have preferred a creamy colored card stock, but red was all I had, and it is my mother-in-law's favorite color, so I decided to go for it.


Since all the photos I chose were digital, I was able to use my Microsoft Publisher program to add captions to each photo. I also re-colored all the photos in a sepia tone to make them look older.


Next, I cut the card stock to 5.5 x 4.25 inches. This gave me 4 photo mounts per page. Having the card stock backing allowed for space to place the holes to tread the ribbon binding without harming the pictures, and it gave a uniform look to each page since my pictures were all different sizes.


Last, I had to choose a ribbon to bind my book. I ended up using the wide ribbon because I thought it looked more romantic, and matched the style of the sachet better.


There you have it! Very simple really, yet it will be a nice trip down memory lane for my niece and my in-laws.

Thanks for stopping by!!